You know those lovely craft projects for organizing your front hall table or wall with a place for keys and mail and tissues and umbrellas and reusable shopping bags and so on? Yeah, must be nice to have any space at all inside your front door.
Not that I'm complaining, much: for a while I had this crazy idea about moving to a bigger place in my neighbourhood and the open house tours revealed that I'm incredibly lucky even to have a closet there. What was it with those 1940s builders? Did winter not require coats then or something?
To make matters worse, you pretty much fall into my kitchen from the 'front hall', so the counter caught all the stuff that comes and goes in one's everyday existence.
Now, I did put together a fix for this, an incredibly makeshift affair that worked okay, even if it wasn't pretty. But I dreamed of something better, and finally, after at least three years of longing to reuse the same pieces in a more functional fashion, I had the time and materials and a gorgeous new Bernina sewing machine for which I wanted some simple sewing projects to start off with.
I present to you: my hall closet organizer:
(Yes, that's the 'After' photo. I know, sad - isn't it? Where do all those water bottles come from anyway, and why on earth do I keep them? There aren't that many picnics in a summer.)
Let's break this baby down into its parts.
1/ An over-the-door hook thingy from IKEA. It's got six hooks with 2-3/4" centres and some spongy padding to keep it from scraping the paint off your door, so I love it, and have several.
2/ A garden variety shower organizer with two hooks - vital, if you want to accommodate those umbrellas.
3/ A supercheap clear plastic shoe organizer from the dollar store. It originally had a metal hanger sticking out of the top, useful for connecting it to the over-the-door thingy, but I cut it off for this project. And I have to tell you, I hated the thought of reusing the shoe thing here. I so wanted to sew my own pockets. But you know what? A DOLLAR. Clear Pockets. Strong enough to last 3 years already of bottle storage. And about an hour of my time saved (to say nothing of the fabric savings.) Sometimes even procrastinators have to be practical.
4/ My new addition was 8 yards (post-shrinkage) of - again, cheap - 19" wide, pre-hemmed on the sides, linen tea towel fabric. I bought this years ago when I was fantasizing about becoming skilled at embroidery, and wanted a canvas. This stuff was black and white which I love, and apparently I thought I'd need a whole lotta yards of it, but after washing and drying it I hated the feel and stuffed it away in a drawer to get musty.
When I remembered it for this project I had to wash it again, of course, and this time it came out like butter. So, craft tip: Even cheap linen is amazing if you only wash and dry it enough.
Instructions
Since it's already hemmed, you're going to love the width of the tea towel fabric exactly as it is and worry only about length. Mostly.
Cutting
Main piece: 60"
Top facing: 6"
Pockets: 1 at 5", 1 at 6.5", and 1 at 8"
Tabs: 6 at 6" long and 2.5" wide
Pressing
1/ On one cut end of each pocket and the top facing piece, press a 3/8" fold, then fold up again at the same distance and press again.
2/ Press one end of the main piece up by 1.5", then fold the edge of that down by 3/8" and press that too.
3/ Fold each tab lengthwise and press flat, then press in a tiny fold on each of the long sides so you can topstitch it shut later. You are not worrying about the short ends at this time.
Sewing
1/ Stitch down the folded hems for each piece, including tabs. I used black thread and tried to sew really straight. Emphasis on 'tried'.
2/ Place unhemmed edge of main piece against unhemmed edge of facing, right side to right side, then tuck the business end of the tabs between the two layers so the ends are flush with main piece and facing. I laid the ends flat and butting sides at points exactly 2-3/4" apart. (remember the centres on the over-the-door hook?) Stitch together, using a 1/4" - 3/8" seam.
3/ Fold facing back, press it open, then fold it behind main piece and stitch the sides of the main piece and facing together. Topstitch the main piece about 3" down from its top edge to secure facing.
4/ Pin el-cheapo shoe organizer to top left corner of the right side of the main piece, just below the topstitched seam. Sew all four sides.
5/ Pin shortest pocket piece wrong side up onto right side of main piece, with the unhemmed edge closest to the shoe organizer, such that said edge is about 6" lower than said shoe organizer. Stitch along the unhemmed length, fold up and press open, then topstitch along the seam. Sew sides of pocket to sides of main piece.
6/ Pin middle pocket piece as in 5/, but 7.5" from bottom of shortest pocket. Continue as for 5/.
7/ Pin largest pocket piece as in 5/, but 9" from bottom of medium pocket. Continue as for 5/.
8. Topstitch all three pockets into sections to suit your needs. I sewed up the middle of the deepest pocket, then divided the middle pocket into three and the top pocket into four.
Finishing
1/ Hang tabs over over-the-door hook thingy.
2/ Hand shower organizer over the second-from-right hook.
3/ Fill as needed.
4/ Have a cup of tea/some chocolate so you can face cleaning up your sewing area.
Showing posts with label tutorial. Show all posts
Wednesday, March 21, 2012
Tuesday, February 22, 2011
How to send hugs to a sick and distant friend
What do you do for someone you love who's stuck in the hospital and you can't go visit? Send a hug in blanket form, of course!
I can't take credit for this idea but I did do the sewing and can attest to its being a super easy project if you have the materials handy, in this case mostly leftover polar fleece though I was told a sheet would do.
The friends with hugs to send each chose their own super soft felted wool from my embarrassingly large stash and traced one of their handprints onto scrap paper. I cut two facing prints for each, pointed the lowest pair of hands downward - woolly fingers ready to be clasped - and turned the ones on the shoulders to the back for a hug.
And then I stitched them on and sent the blanket on its way, where I hope it's doing a whole lot of good.
I can't take credit for this idea but I did do the sewing and can attest to its being a super easy project if you have the materials handy, in this case mostly leftover polar fleece though I was told a sheet would do.
The friends with hugs to send each chose their own super soft felted wool from my embarrassingly large stash and traced one of their handprints onto scrap paper. I cut two facing prints for each, pointed the lowest pair of hands downward - woolly fingers ready to be clasped - and turned the ones on the shoulders to the back for a hug.
And then I stitched them on and sent the blanket on its way, where I hope it's doing a whole lot of good.
Monday, February 14, 2011
How to make a hugging pillow
This Valentine's Day, I thought it would be fun to use up some of my softest felted sweaters on a pair of hugging pillows.
It would have taken maybe 4 hours tops including photography time if I hadn't gotten distracted by a pair of cats, but more on that later.
In addition to thread and a sewing machine you will need:
A set of nesting mixing bowls you are comfortable running a rotary cutter around
A rotary cutting mat and cutters
Scissors
Castoff cloth dinner napkins a little larger than the largest bowl, or other lining fabric
Stuffing
Soft felted wool sweaters, enough to provide at least four circles cut around the largest bowl
Yarn for blanket stitching the pillow covers over the pillow
First up, use the biggest bowl to cut out circles for the front and back of your stuffed pillow, plus the front and back of your pillow cover. I found it easiest to cut up the sides of the sweaters so I'd get the flattest possible fabric. If you're layering a smaller circle over one or both of the covers, cut that with the next-smallest bowl.
(I did that because the super soft sweater I wanted to use for Side B features a delicate eyelet lace pattern not entirely lost in the felting. Bit of a visual waste of the stripey underlayer but it wasn't really soft enough for a pillow on its own, and it does provide a lot of extra squish factor. I put the wrong side up for nicely blurred stripes, a different sort of soft.)
Then cut out any embellishments, like a heart or a pocket.
You have to be opportunistic with felted wool sweaters. When I bought this orangey red cap-sleeved mock turtleneck sweater I couldn't figure out why anybody would design such a thing in superhot alpaca, but when I noticed how nicely the cap sleeves would work for pockets on my pillows, I gave that designer mental thanks and snipped them right off.
Doesn't it all look pretty when you stack it up?
This is where the cats come in. While I pressed everything and stitched the embellishments down (layer by layer so as not to accidentally stitch your pocket down in the middle without thinking, as has happened to me but not, thankfully, this time) I plotted what I could possibly make to tuck into the pockets. A small stuffed animal made sense, and what can I say? I like cats. Probably should have gone for a long skinny shape to fit into the pocket better, but hey.
Yes, I embroidered the face with the sewing machine. With regular stitch and backstitch, because it's a 1940s Singer without a single bell or whistle.
They are too big to fit into the pockets. If you make a hugging pillow, you can learn from my mistake.
Back to the pillows. Stitch around most of the circle about as far in as you expect to do your blanket stitching later, leaving a gap big enough to push through stuffing,
Then turn inside out, press if compulsive, and stuff:
After that, it's all over but the blanket stitching. I ended up using leftover sock yarn with a gradual colour change (Noro Silk Garden, if you're a knitter) to get a good match for the stripes on the pocket side. And I stitched a little more than half of the circle before tucking in the pillow, to make it easier to get the sides to line up well.
I think all I need to make these a perfect gift is chocolate and a good book, don't you?
Hope your Valentine's Day has hugs in it!
It would have taken maybe 4 hours tops including photography time if I hadn't gotten distracted by a pair of cats, but more on that later.
In addition to thread and a sewing machine you will need:
A set of nesting mixing bowls you are comfortable running a rotary cutter around
A rotary cutting mat and cutters
Scissors
Castoff cloth dinner napkins a little larger than the largest bowl, or other lining fabric
Stuffing
Soft felted wool sweaters, enough to provide at least four circles cut around the largest bowl
Yarn for blanket stitching the pillow covers over the pillow
First up, use the biggest bowl to cut out circles for the front and back of your stuffed pillow, plus the front and back of your pillow cover. I found it easiest to cut up the sides of the sweaters so I'd get the flattest possible fabric. If you're layering a smaller circle over one or both of the covers, cut that with the next-smallest bowl.
(I did that because the super soft sweater I wanted to use for Side B features a delicate eyelet lace pattern not entirely lost in the felting. Bit of a visual waste of the stripey underlayer but it wasn't really soft enough for a pillow on its own, and it does provide a lot of extra squish factor. I put the wrong side up for nicely blurred stripes, a different sort of soft.)
Then cut out any embellishments, like a heart or a pocket.
You have to be opportunistic with felted wool sweaters. When I bought this orangey red cap-sleeved mock turtleneck sweater I couldn't figure out why anybody would design such a thing in superhot alpaca, but when I noticed how nicely the cap sleeves would work for pockets on my pillows, I gave that designer mental thanks and snipped them right off.
Doesn't it all look pretty when you stack it up?
This is where the cats come in. While I pressed everything and stitched the embellishments down (layer by layer so as not to accidentally stitch your pocket down in the middle without thinking, as has happened to me but not, thankfully, this time) I plotted what I could possibly make to tuck into the pockets. A small stuffed animal made sense, and what can I say? I like cats. Probably should have gone for a long skinny shape to fit into the pocket better, but hey.
Yes, I embroidered the face with the sewing machine. With regular stitch and backstitch, because it's a 1940s Singer without a single bell or whistle.
They are too big to fit into the pockets. If you make a hugging pillow, you can learn from my mistake.
Back to the pillows. Stitch around most of the circle about as far in as you expect to do your blanket stitching later, leaving a gap big enough to push through stuffing,
Then turn inside out, press if compulsive, and stuff:
After that, it's all over but the blanket stitching. I ended up using leftover sock yarn with a gradual colour change (Noro Silk Garden, if you're a knitter) to get a good match for the stripes on the pocket side. And I stitched a little more than half of the circle before tucking in the pillow, to make it easier to get the sides to line up well.
I think all I need to make these a perfect gift is chocolate and a good book, don't you?
Hope your Valentine's Day has hugs in it!
Wednesday, February 2, 2011
How to make felted wool pins
I've been making so many of these pins this week, I thought I'd better take some photographs and do a tutorial... even though they are so easy, really, as to not need much instruction.
You will need:
Two felted shapes (in this case hearts) that are cut exactly the same
A darning needle and length of yarn that's even longer than you think you're going to need
A backing pin.
Run the darning needle through the wrong side (which will become the inside) of the shape you'll be using for the back, at the point where you want the pin to sit.
Don't make a knot at the end or pull the yarn all the way through - if you leave a tiny tail, you'll be able to secure it and the pin at the same time.
Now start sewing on the pin on the right side (aka outside), catching the original run of yarn as you tighten each stitch so it's held in place.
Once the pin is on, bring the yarn back to the wrong side (inside) and catch just enough of the fabric to run the yarn to the edge of the shape without anything showing on the right side (outside.)
Position the front piece with its right side facing away from the back piece, perfectly placed to match every curve, and begin a border of blanket stitch (instructions here, compliments of the awesome Stitch School.)
... and that's about it.
You may find they're rather addictive.
This isn't the only thing I've been up to with my felted wool hearts, but that's a tutorial for another day!
You will need:
Two felted shapes (in this case hearts) that are cut exactly the sameA darning needle and length of yarn that's even longer than you think you're going to need
A backing pin.
Run the darning needle through the wrong side (which will become the inside) of the shape you'll be using for the back, at the point where you want the pin to sit.
Don't make a knot at the end or pull the yarn all the way through - if you leave a tiny tail, you'll be able to secure it and the pin at the same time.
Now start sewing on the pin on the right side (aka outside), catching the original run of yarn as you tighten each stitch so it's held in place.
Once the pin is on, bring the yarn back to the wrong side (inside) and catch just enough of the fabric to run the yarn to the edge of the shape without anything showing on the right side (outside.)
Position the front piece with its right side facing away from the back piece, perfectly placed to match every curve, and begin a border of blanket stitch (instructions here, compliments of the awesome Stitch School.)
... and that's about it.You may find they're rather addictive.
This isn't the only thing I've been up to with my felted wool hearts, but that's a tutorial for another day!
Tuesday, January 25, 2011
A skirt from just one sweater
Check out this 'After' shot!
I've been wearing my original felted wool skirt so much, I decided I needed another. I found this sweater at the local thrift store:
It's your basic merino wool turtleneck, in size XL. Even felted, it was still super long, which is where I got the idea to make a whole skirt from this and nothing else.
First, I cut the sweater across the back and chest, at the armpits. It fit my hips all right, and it would have made a great miniskirt as it was, but I wanted to go as close to knee length as I could. So I cut a piece as wide as the front would allow...
...and then across the base of the turtleneck with my pinking shears, since I wasn't going to have the nice tailored hem I got last time. I did the same with the back, matching the length of what I got from the front.
Sewing those two pieces together wasn't going to give me enough coverage, so I cut open the sleeves and got two more, much narrower, pieces of the same length from each of them.
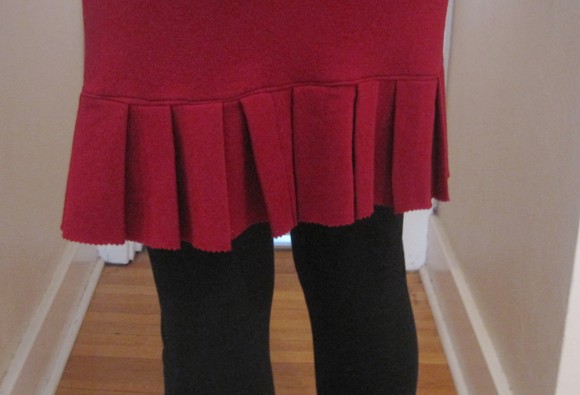
I made a long strip of those pieces, the pinked edges all on one end, and then I sewed them into a tube. Pinning right side to right side, I fit that wide frill onto the raw edge of the sweater's body and improvised pleats as I'd done with the original skirt. Only this time I had so much fabric I had to put pleats right across the back after making the little kick pleat I like on the right of center in front.
Once I'd sewn the frill in place and rather sloppily topstitched the seam from above (I tried it just below the seam first, but the pleats were too much for my machine) I took a look for moth holes.
Yep, front and center - the last place you want to put any sort of applique. So I improvised this geometric design to draw the eye over to the side. The hole is at the top left edge of it.
It still needs work. I've been eying the sleeve cuff for a possible pocket, and if you thought it looked a little wide in that top shot you weren't wrong - even though felted wool tends not to slip down over leggings, this baby could stand to be taken in a lot at the waist. But when I pressed the pleats under a wet cloth they looked downright professional, and at this length, it's so warm.
Plus, it matches the handspun cuff of my boot socks! Gotta love that.
I've been wearing my original felted wool skirt so much, I decided I needed another. I found this sweater at the local thrift store:
It's your basic merino wool turtleneck, in size XL. Even felted, it was still super long, which is where I got the idea to make a whole skirt from this and nothing else.First, I cut the sweater across the back and chest, at the armpits. It fit my hips all right, and it would have made a great miniskirt as it was, but I wanted to go as close to knee length as I could. So I cut a piece as wide as the front would allow...
...and then across the base of the turtleneck with my pinking shears, since I wasn't going to have the nice tailored hem I got last time. I did the same with the back, matching the length of what I got from the front.
Sewing those two pieces together wasn't going to give me enough coverage, so I cut open the sleeves and got two more, much narrower, pieces of the same length from each of them.
I made a long strip of those pieces, the pinked edges all on one end, and then I sewed them into a tube. Pinning right side to right side, I fit that wide frill onto the raw edge of the sweater's body and improvised pleats as I'd done with the original skirt. Only this time I had so much fabric I had to put pleats right across the back after making the little kick pleat I like on the right of center in front.
Once I'd sewn the frill in place and rather sloppily topstitched the seam from above (I tried it just below the seam first, but the pleats were too much for my machine) I took a look for moth holes.
Yep, front and center - the last place you want to put any sort of applique. So I improvised this geometric design to draw the eye over to the side. The hole is at the top left edge of it.It still needs work. I've been eying the sleeve cuff for a possible pocket, and if you thought it looked a little wide in that top shot you weren't wrong - even though felted wool tends not to slip down over leggings, this baby could stand to be taken in a lot at the waist. But when I pressed the pleats under a wet cloth they looked downright professional, and at this length, it's so warm.
Plus, it matches the handspun cuff of my boot socks! Gotta love that.
Monday, December 13, 2010
From three felted sweaters to one fabulous skirt
On Saturday I finally had time to fix a skirt I botched in the fall, and it's so cool I thought somebody else might want to know how to make one. Sorry this isn't a real step-by-step pictorial, but it's such a dead easy project you probably don't need one anyway.
This is one of those lucky find kinds of projects. You need at least three merino wool sweaters because they tend to be thin and felt softly - ask me how I know a sweater that felts to the thickness of board won't work - of which one has to have a torso that felts to exactly your hip size.
Materials
One merino sweater with a torso that felts to your hip measurement and a ribbed cuff around the waist
At least two merino sweaters with a folded or flat (as in, not ribbed or gathered) hem, buttons and pockets a bonus
Instructions
First, you will cut the flat-hemmed sweaters off at the armpits, thereby freeing yourself to use the flat hem as the hem of the skirt.
Next, you will cut both bodies at one side, at least, to make a long strip of fabric. One of my two was a button-up vest with pockets, and I wanted to save one of those front pieces for a different skirt later, so I cut it in three pieces leaving the back of the vest intact and separating the button band for use elsewhere.
Now you want to stitch these sweater bodies together into one long strip, which when complete you will sew into a tube (leaving the upper part, where the armpits were, free to stitch onto your waistband later.) Because I had had to cut my vest, I cut the other sweater into two pieces so that I could have a grey-black-grey-black repeat. That sort of decision is entirely up to you; just make sure you get the hems lined up as perfectly as possible.
At this point you will address moth holes. My grey vest had several, but thanks to clever use of the button band, they became design features. (That's part of the button band over there on the right; the buttonholes are more obvious in person.)
I stitched my fakery over panels where possible, which is why I waited until I had a tube, but you may prefer to do this job before you join the strip.

Now you are ready to make your waistband. Cut the cuffed sweater across, just below the armpits, and turn it such that the cuff is now the waistband, and the torso the hip. Start pinning the hemmed tube to the hip section with eventual wear in mind, pleating the fabric to fit.
For my skirt, I wanted the pocket at the front of my right leg, as shown above. I also wanted pleats primarily on my left hip, so in addition to the one at the back part of my right hip for balance, I put deep ones there with two falling at the front and two at the back. Each set faces the other to make a flat patch at their centre.

Run one row of stitching close to the edge with the right sides of your hip and hem sections facing, then open it up and topstitch the seam along its hip side.
And - you're done! And I dare you to take if off again once it's on.
This is one of those lucky find kinds of projects. You need at least three merino wool sweaters because they tend to be thin and felt softly - ask me how I know a sweater that felts to the thickness of board won't work - of which one has to have a torso that felts to exactly your hip size.Materials
One merino sweater with a torso that felts to your hip measurement and a ribbed cuff around the waist
At least two merino sweaters with a folded or flat (as in, not ribbed or gathered) hem, buttons and pockets a bonus
Instructions
First, you will cut the flat-hemmed sweaters off at the armpits, thereby freeing yourself to use the flat hem as the hem of the skirt.
Next, you will cut both bodies at one side, at least, to make a long strip of fabric. One of my two was a button-up vest with pockets, and I wanted to save one of those front pieces for a different skirt later, so I cut it in three pieces leaving the back of the vest intact and separating the button band for use elsewhere.
Now you want to stitch these sweater bodies together into one long strip, which when complete you will sew into a tube (leaving the upper part, where the armpits were, free to stitch onto your waistband later.) Because I had had to cut my vest, I cut the other sweater into two pieces so that I could have a grey-black-grey-black repeat. That sort of decision is entirely up to you; just make sure you get the hems lined up as perfectly as possible.
At this point you will address moth holes. My grey vest had several, but thanks to clever use of the button band, they became design features. (That's part of the button band over there on the right; the buttonholes are more obvious in person.)
I stitched my fakery over panels where possible, which is why I waited until I had a tube, but you may prefer to do this job before you join the strip.
Now you are ready to make your waistband. Cut the cuffed sweater across, just below the armpits, and turn it such that the cuff is now the waistband, and the torso the hip. Start pinning the hemmed tube to the hip section with eventual wear in mind, pleating the fabric to fit.
For my skirt, I wanted the pocket at the front of my right leg, as shown above. I also wanted pleats primarily on my left hip, so in addition to the one at the back part of my right hip for balance, I put deep ones there with two falling at the front and two at the back. Each set faces the other to make a flat patch at their centre.

Run one row of stitching close to the edge with the right sides of your hip and hem sections facing, then open it up and topstitch the seam along its hip side.
And - you're done! And I dare you to take if off again once it's on.
Friday, June 18, 2010
How to make a child's hiking satchel
I sewed these two satchels as gifts for two cousins sharing a 6th birthday party - the invitation said 'no gifts required' which translates to "Please! No more toys! The house is overflowing!" Since the boy's family does a fair bit of camping, a hiking accessory was a logical alternative.

The birthday girl has a little sister, so I made two satchels for her from a vintage bedspread; the birthday boy's was new denim. Both used lightweight cotton for their lining.

If you make one, be prepared: Other Children may ask for some of their own. (I'm already on duty for two more, minimum.)
You will need:

2 flap pieces, each 8.25" x 11", one each in the lining and outer fabric
2 bag pieces, each 12" x 19.5", one each in the lining and outer fabric
1 strap piece, 3.75" x 34", in the outer fabric
1 button or toggle 3/4" -1" wide
1 closure loop approximately 3" long (I knit an i-cord in wool for elasticity - Patons Classic Wool on 3.5mm needles, two stitches knit over and over for 20 rows)
Instructions:

Lay flap pieces right side to right side and slip under the needle 4.5" or less from the end of one long side, then stitch around to the same distance from the other end of the same long side, leaving at least a 2.25" gap, with a 3/8" seam allowance. Trim off corners and turn inside out, tucking in the exposed edges of the gap and pressing flat.

Stitching them separately, lay each bag piece right side to right side and stitch down the two sides with a 3/8" seam allowance. Fold the stitched piece flat with the seams in the middle, then stitch across the bottom corner to make a box bottom. Aim for about a 2.5" run of stitching, matching the length for both the liner and the outer bag.

Slip the liner inside the outer bag, wrong side to wrong side, and set aside.

There are two options for stitching the strap. Right side to right side and a line of stitching down the open edge is great if your fabric has some give (like my vintage cotton bedspread) but for something stiffer, like denim, try folding in and pressing flat about 1/4" of fabric down the length of the strap, then folding the fold over the other side and topstitching down the middle of the strap. That way, you avoid having to turn it inside out.

Fold in by 3/8" the exposed edges of both bag and liner, press, and - tucking the strap ends into place at the side seams - pin into position. Stitch down as close as you can to the outer edge while catching the lining. To reinforce the strap without adding extra rows of stitching, backstitch over it a couple of times before stitching onward.

Tie a knot in the ends of the i-cord or, in the case of a ribbon or other cord, simply fold into a loop.

Tuck just inside the opening of the flap, pin in place, and topstitch across bottom end of flap.

The flap will be too wide for the bag, but that's okay - the idea is to have a little leeway for an extra-big book or especially interesting find on the trail. Center the non-loopy end on the back of the bag - wrong side of the flap to right side of the bag - and fold in anything that extends past the straps on the sides. Pin down and topstitch into place.
It will now look something like this:

Stitch the button or toggle onto the center front; if you choose a flat button, you can wind thread around your stitching to make a shank the loop can snug up to.

And you're done! One completed bag, one very happy inquisitive child.

The birthday girl has a little sister, so I made two satchels for her from a vintage bedspread; the birthday boy's was new denim. Both used lightweight cotton for their lining.

If you make one, be prepared: Other Children may ask for some of their own. (I'm already on duty for two more, minimum.)
You will need:

2 flap pieces, each 8.25" x 11", one each in the lining and outer fabric
2 bag pieces, each 12" x 19.5", one each in the lining and outer fabric
1 strap piece, 3.75" x 34", in the outer fabric
1 button or toggle 3/4" -1" wide
1 closure loop approximately 3" long (I knit an i-cord in wool for elasticity - Patons Classic Wool on 3.5mm needles, two stitches knit over and over for 20 rows)
Instructions:

Lay flap pieces right side to right side and slip under the needle 4.5" or less from the end of one long side, then stitch around to the same distance from the other end of the same long side, leaving at least a 2.25" gap, with a 3/8" seam allowance. Trim off corners and turn inside out, tucking in the exposed edges of the gap and pressing flat.

Stitching them separately, lay each bag piece right side to right side and stitch down the two sides with a 3/8" seam allowance. Fold the stitched piece flat with the seams in the middle, then stitch across the bottom corner to make a box bottom. Aim for about a 2.5" run of stitching, matching the length for both the liner and the outer bag.

Slip the liner inside the outer bag, wrong side to wrong side, and set aside.

There are two options for stitching the strap. Right side to right side and a line of stitching down the open edge is great if your fabric has some give (like my vintage cotton bedspread) but for something stiffer, like denim, try folding in and pressing flat about 1/4" of fabric down the length of the strap, then folding the fold over the other side and topstitching down the middle of the strap. That way, you avoid having to turn it inside out.

Fold in by 3/8" the exposed edges of both bag and liner, press, and - tucking the strap ends into place at the side seams - pin into position. Stitch down as close as you can to the outer edge while catching the lining. To reinforce the strap without adding extra rows of stitching, backstitch over it a couple of times before stitching onward.

Tie a knot in the ends of the i-cord or, in the case of a ribbon or other cord, simply fold into a loop.

Tuck just inside the opening of the flap, pin in place, and topstitch across bottom end of flap.

The flap will be too wide for the bag, but that's okay - the idea is to have a little leeway for an extra-big book or especially interesting find on the trail. Center the non-loopy end on the back of the bag - wrong side of the flap to right side of the bag - and fold in anything that extends past the straps on the sides. Pin down and topstitch into place.
It will now look something like this:

Stitch the button or toggle onto the center front; if you choose a flat button, you can wind thread around your stitching to make a shank the loop can snug up to.

And you're done! One completed bag, one very happy inquisitive child.
Monday, February 22, 2010
How to make a child-sized art bag
Last week I made a birthday gift for friend turning 6; she's a very hip 6, so I thought another bag of art supplies was in order. This time I did a messenger style bag and, since the supplies included fabric markers, I decided to include a part she could draw on.
First though, I had to cut out pieces. In the main fabric, cut:
1 strip 5" x 39.5", for the strap
1 piece 10" (or 12") x 26", for the bag
2 pieces 6.5" x 10" each, for interior pockets.

And then - pull out a freshly ironed man's shirt, in my case acquired after the collar and cuffs had gotten a bit too worn for wear. The object of your interest: the buttony stuff down the front.
Line up the 10" (or 12") end of the bag piece against three of the buttonholes - this is easier if you've already cut off the collar - and when they are centred, snip into the buttonhole band at each end to mark the place.

Then lift the buttonhole fold a little to cut neatly along the underside of it.

After that, turn to the button band and cut between the buttons such that you have a clean run of 2 buttons on three different pieces - because mistakes happen, and you know that child is going to need backup canvasses. I cut mine about 6" long.

And then you're off to the sewing machine.
Folding right side to right side, turn over the tops of the bag and pockets twice, as narrow as you can, to hide the cut edge. Then press them and stitch them down.
Also right side to right side, run a seam down the length of the strap, turn it inside out, press it, and fold the ends up inside the strap before pressing them as well.
And finally, fold each of the pocket pieces wrong side to wrong side, stitch a 1/8" seam down each of their sides, fold them back so that the right sides face the right sides, and stitch a 1/4" seam to hide that cut edge.
Here is a summary of those steps:

Pin the pockets to the top of the wrong sides of the bag piece, and at the same time pin the buttonhole strip (preferably the side with the raw edge where it was cut from the shirt) along the right side of one of them and topstitch those into place. Stitch only the top of the buttonhole band; leave the bottom open so it's easier to use.

Had I planned the sizing better on my bag, I might not have had to fold in the ends of the strap so they were out of the way of the buttonholes before I stitched them down, ahem. This is where the 12" wide bag piece comes in handy.

Now the clever part: Take those button band pieces and fold in the sides and bottom, double, on the button side of the fabric. Press, pin, and stitch down.

Especially if you do the 12" width, you can fit in quite a few nice art things.

Your last step is to tuck two of the white squares into one of the pockets with a note explaining how to use the fabric markers to customize the bag, and then button the third onto the front of the bag - buttons facing inward.

I love this bag and I really think I need one in my size, don't you?
First though, I had to cut out pieces. In the main fabric, cut:
1 strip 5" x 39.5", for the strap
1 piece 10" (or 12") x 26", for the bag
2 pieces 6.5" x 10" each, for interior pockets.

And then - pull out a freshly ironed man's shirt, in my case acquired after the collar and cuffs had gotten a bit too worn for wear. The object of your interest: the buttony stuff down the front.
Line up the 10" (or 12") end of the bag piece against three of the buttonholes - this is easier if you've already cut off the collar - and when they are centred, snip into the buttonhole band at each end to mark the place.

Then lift the buttonhole fold a little to cut neatly along the underside of it.

After that, turn to the button band and cut between the buttons such that you have a clean run of 2 buttons on three different pieces - because mistakes happen, and you know that child is going to need backup canvasses. I cut mine about 6" long.

And then you're off to the sewing machine.
Folding right side to right side, turn over the tops of the bag and pockets twice, as narrow as you can, to hide the cut edge. Then press them and stitch them down.
Also right side to right side, run a seam down the length of the strap, turn it inside out, press it, and fold the ends up inside the strap before pressing them as well.
And finally, fold each of the pocket pieces wrong side to wrong side, stitch a 1/8" seam down each of their sides, fold them back so that the right sides face the right sides, and stitch a 1/4" seam to hide that cut edge.
Here is a summary of those steps:

Pin the pockets to the top of the wrong sides of the bag piece, and at the same time pin the buttonhole strip (preferably the side with the raw edge where it was cut from the shirt) along the right side of one of them and topstitch those into place. Stitch only the top of the buttonhole band; leave the bottom open so it's easier to use.

Had I planned the sizing better on my bag, I might not have had to fold in the ends of the strap so they were out of the way of the buttonholes before I stitched them down, ahem. This is where the 12" wide bag piece comes in handy.

Now the clever part: Take those button band pieces and fold in the sides and bottom, double, on the button side of the fabric. Press, pin, and stitch down.

Especially if you do the 12" width, you can fit in quite a few nice art things.

Your last step is to tuck two of the white squares into one of the pockets with a note explaining how to use the fabric markers to customize the bag, and then button the third onto the front of the bag - buttons facing inward.

I love this bag and I really think I need one in my size, don't you?
Subscribe to:
Posts (Atom)